This is only starting for us

So with Mother’s Day just around the corner, I thought I’d share a little mini booklet I made for my mom a couple of years back:

I really like the soft pink quilled heart (by PaperPoetry) and the Polaroid frame (a Papertrey die, cut from Neenah Solar White 100 lb). The ribbon is one of my very favorites I’m afraid they might not make anymore by May Arts. The background paper is also an absolute fave of mine by Crate Paper.

On the inside, I created a tiny booklet on the left and glued a metal clip to the right side, both to hold some pictures of us together.

The happy together die is from Concord & 9th and most of the paper and embellishments is from Crate Paper.

In other news, we are moving! Exciting times! As I am writing this, we are sitting amidst boxes upon boxes and in about a week, we will start a new adventure! A new place, a new job… whew! It’s been a long time in the making though and we are just so glad things have finally worked out for us and we’re ready to begin the next chapter!

So with that, I am going to sign off for now. Have a great week and I’ll see you on the other side 😉

Xoxo – Nina

(Title from “Good Feeling” by Bakermat ft. Rhys Lewis)

Advertisement

Night falls and towns become circuit boards

Happy Sunday!

Springtime is well underway in this neck of the woods, and so I wanted to share another handmade card with you:

This was made for my mom’s birthday. The tiny envelope (Sizzix) was die-cut twice, so as to ensure that the inside looked just as neat as the outside. The hearts are from the same set.

The sprigs are also Sizzix dies, cut out of watercolored paper strips. The only stamped element is the sentiment, which is from Papierprojekt and was heat-embossed white on black.

A couple black ink splatters later, the card was finished. Ths design was inspired by one of the many beautiful creations by Julia at derkleineklecks, though her colour combo is much softer and so very lovely:

https://derkleineklecks.blogspot.com/2019/06/grue-im-umschlag.html?m=1

She makes the most gorgeous paper creations and continues to amaze the papercrafting community with her skill and talent. If you don’t know her blog, check it out!

Have a great day!
Nina

(Title: Books from Boxes by Maximo Park)

The future might never happen

Another week, another card!

This birthday card came about because my favorite person had a birthday coming up and I needed a card just as special as them.

The adorable drawing by illustrator extraordinaire Anita Jeram immediately caught my attention and I knew right then and there who I‘d make a card for with this.

I stamped the image onto watercolor paper and then took out my watercolors, following the example on the back of the packaging quite closely.

The watercolors are Gansai Tambi and the perfect greeting came to me as a fussy-cut sentiment from 12×12 patterned paper by Crate Paper. I gave it a bit of a wavy shape and glued down one part directly to the watercolored panel and added some foam adhesive to the left part of the banner for more dimension.

The card base was stamped with a background stamp by The Stamp Market, in white ink.

The card itself is rather simple, but the very special and sweet central image plus the bold sentiment make this one of my favorite cards I’ve made.

Enjoy your weekend and talk to you soon!Nina

(Title lyric by Rhys Lewis – To be Alive)

… and I’ll see what I can do to paint your grey skies blue

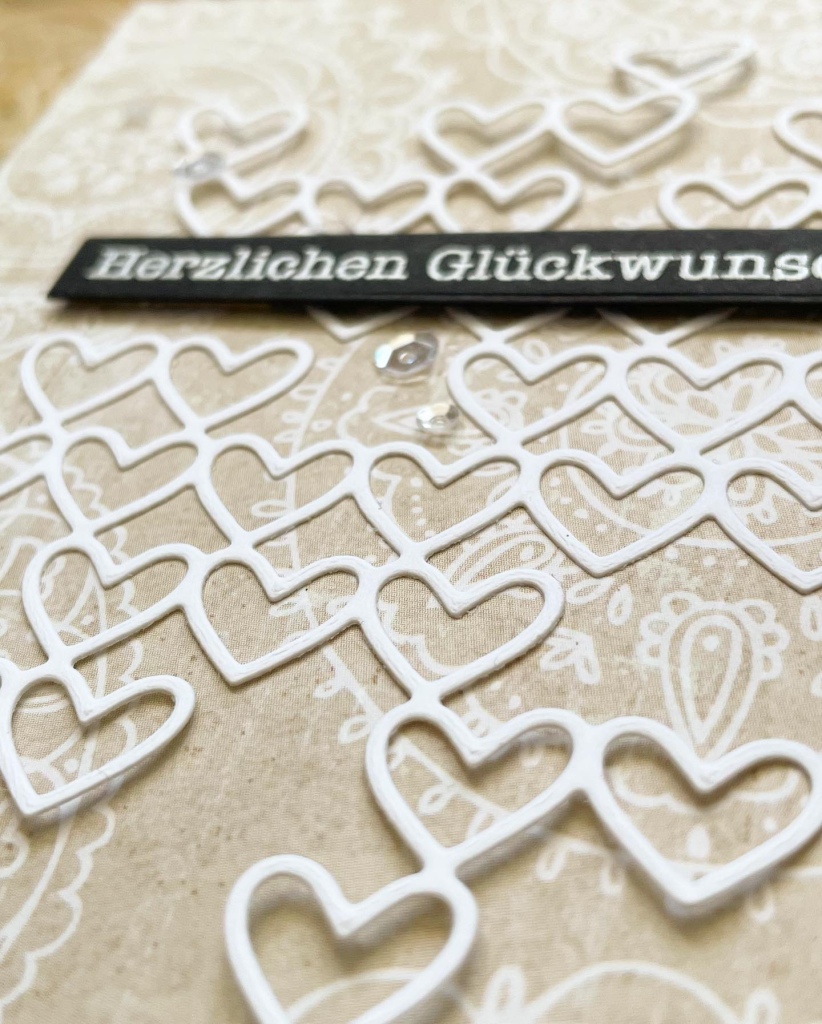
As grey and gloomy and in-between as these days feel, here’s a light and airy card to lift your spirits:

The background paper was a leftover from a mini album class I took many moons ago with Dana at the Papierwerkstatt – so I’m not sure where it’s from, but it’s old! 😄

The hearts die is from Simon Says Stamp and makes for a very dainty, love-themed background.

To finish things off, I went bold and added a heat-embossed “label”-type sentiment (the stamp is an oldie but goodie from Papierprojekt). The sequins for a tiny bit of shimmer and sparkle are of the “Sparkling Clear” variety from Pretty Pink Posh.

As you can see, I sometimes like to only glue down parts of the die-cut, for more dimension.

Given the color scheme, I’d say this card would be appropriate for a wedding. What do you think? 🙂

Have a lovely weekend!

(Title from The Fratellis – Laughing Gas)

January blues

Won’t you look at this miracle? Mannheim and the river Rhine turned magical wonderland, just for one miraculous weekend in January 2023.

But of course I’ve come here to show you a little handmade card, no surprises there 😉

Matches the colour scheme of that snowscape up there quite nicely, don’t you think?

I had seen this idea on a mini album cover created by the crafty mastermind that is Steffi Ried and had to try it myself – using some Cocoloko patterned (ombré) paper and a Lora Bailora palm leaf die.

The sentiment is from The Stamp Market and the label sentiment is from Mama Elephant, if I remember correctly. A few black ink splatters and the trusty old sewing machine provide the finishing touches.

Have you tried ombré on a card or layout?
And what’s a type of die you can’t get enough of? For me it’s leaves and botanicals, for sure! 😄

And that’s already all she wrote 🙂

Have a lovely rest of the week!

Xoxo

It’s alive!!! (Part Two)

Happy New Year!

I feel compelled to say something about the lengthy hiatus, but life happened and yeah I’m still here, still making cards and the occasional scrapbook page or mini album. So I thought I’d dust off my trusty old blog – thanks for sticking around and for taking a peek today! 🙂

Now onto what I wanted to share: Are you sick and tired of Christmas content? Have you packed away all the decorations yet? Maybe even completely rearranged the living room – new year, new you? 😊

Over here, we’re doing things step by step – the only room still completely in festive mode is the study / craft room though, with my favorite Christmas cards still on display, like this little number I made in December.

It was inspired by the awesome Chari Moss and her beautiful card made for the 2021 Essentials by Ellen Holiday Release. Her color combo immediately got me swooning: Tattered Rose, Worn Lipstick and Seedless Preserves.

I ink blended these Distress Oxides on this panel and then ran it it through an embossing folder by WRMK. The vellum is from Papertrey Ink as is the word die. The precious ribbon was bought on my 2015 trip to NYC at @purlsoho 💕

Hope you’re having a great week!

My spidey senses are tingling

Hallo ihr Lieben,

anlässlich des langen Wochenendes dachte ich mir, ich mach’ mal bei der Stempelküche-Challenge mit 🙂

Die Aufgabe war: Wir spinnen – eeek! 😄
46711412_2240355276285512_4596657030210519040_o

Genau einen einzigen Stempel mit einem kleinen, achtbeinigen Zeitgenossen besitze ich – und bei mir hier ist das kleine Spinnentier verliebt. 💕

Da ich natürlich keinen passenden Spruch als Stempel hatte, wurde kurzerhand (ha! Ha ha! Kurz – als ob ;)) ein eigens gestalteter Gruß auf dem wunderbar dicken Transparentpapier von PTI ausgedruckt.

Die niedliche Spinne ist ein alter Holzstempel von Stampendous, das Netz von Hand gezeichnet, die kleinen Filz-Herzchen sind mit Stanzen von Julie Ebersole ausgestanzt.

Sehr clean und simple, das dauert ja bekanntlich am längsten 😉

Habt ein schönes Wochenende!
Nina

Summer Splash

Another post, another alliteration 😉

How is everyone? I hope you’re all enjoying your summer vacation and have gone/are going on gorgeous trips to lovely places.

Let me show you a couple of cards I made last night in sort of a crafting fit after having been very productive – for a Saturday anyway 😀

The idea for this card came from this fantastic card by Yana Smakula I had pinned and when I browsed my Paper Love pinboard yesterday night, this stunning creation once again caught my eye.

I then looked through my stash to find a stamp set that would lend itself to the technique and grabbed my Paper Smooches “Reflections” set as well as a good number of inks I thought would work well together.

I made sure to start with the black sentiment, stamped doubly with the Misti and also followed Yana’s other instructions from her video. I loved listening to her and think she explains everything really well 🙂I started stamping the largest elements first and worked my way towards the smaller images, always keeping that white 1/4″ border in mind that Yana mentions.

The trickiest part was really to find a color combination that works. I don’t have a large collection of inks and the ones I do have are from different manufacturers such as Altenew, Distress, PTI, Archival, Avery Elle, MFT, Studio Calico etc. I tried to orient myself towards the color combo Yana had used and ended up using all dye inks.

The second card uses the same recipe, I just switched out the turquoise color and filled the space a bit differently. Finally, I took some colored pencils to give the stamped images more depth and texture – that makes all the difference, I believe. The card changes from “flat” to “more texture” and from “simply stamped” to “more artsy”, I’d say.

Again, I don’t have a huge collection of colored pencils, but the ones I have were a good match, I find 🙂

What about you? Are you an ink collector? How do you find good color combos with the inks you have? I’d love to hear from you! 🙂

Nina

Easter Extravaganza

Hello all,

Excuse the grand title, but don’t you just love an alliteration?
I know I do 😀

As promised, I have four coordinating cards to show you today, all made from one ad that landed in my (physical) mailbox a few weeks ago.

Boden, as you might know, is a mail-order company for fashion that I’d say is a bit out-of-the-ordinary and they sometimes send me a coupon or the like. This time, the advertising letter had such pretty design, I had to cut it apart and use it!

But I’ll let you see for yourself:
IMG_0403.jpg
Isn’t the pattern just delightful?!! ❤

The first card was made by simply die-cutting a circle out of the first page of the original ad in order to get rid of the text in the middle.

I then added a cross-stitched circle I die-cut from Raspberry Fizz cardstock (PTI), using a Concord & 9th as well as a Lawn Fawn die. It was all matted onto coordinating Lavender Moon CS (PTI) and the first pretty card was done!

Quick & easy! 😀

IMG_0404 2.jpg
The second page of the tri-fold ad also begged to be cut up 😉 So again, I took a large circle die (MFT) and went to work…

IMG_0408.jpg
Those cute parrots on pink just pop! 😀

I added the “fiesta” (MFT) die-cut in Scarlet Jewel (PTI) and mounted it onto thin strips of foam adhesive. The banner (LawnFawn) was cut from black cardstock and the sentiment hand-written using a Uniball Signo White. The background cardstock here is Soft Blush by PTI. Tadaa!

Don’t the vibrant colors just scream spring and summer?! 🙂

IMG_0409.jpg
The last page of the tri-fold had two more of those sweet little birds, so I decided to die-cut those into tags, getting out my trusty old Crop-A-Dile and eyelets.

(I feel there was definitely some inspiration by derkleineklecks and faltzauber going on – I’ve seen them use eyelets and string so much in the last few months!)

IMG_0419.jpg
I prepped the background with a stamp from Florilèges Design in Cement Ink by MFT, a few sprinkles of Mr. Huey’s and some vellum leaves (Kesi’Art) tucked behind the tag.IMG_0413.jpg
The last one is quite similar, though I switched up the color palette to include more vibrant Scarlet Jewel (PTI) leaves and more messy splatters. 🙂

IMG_0423.jpg
What do you think?

I really enjoyed upcycling the ad and using the pretty design rather than tossing it! So: Thanks, Boden! 🙂 (Please keep sending me pretty mail – I think I’ll use my coupon to order some cute dresses I’ve been ogling! ^^)

Wishing you all a lovely Easter Sunday!
Nina

Out with the old, in with the new

Hello hello,

I’m just checking in with a happy little trio of cards – all of which are birthday cards.

The other week, I was swooning over this stunning creation by Rebecca Luminarias and I knew I wanted to make something like it, just using what I have on hand. (I’m very much looking forward to placing my first order with The Stamp Market, though! Such gorgeous products!! ❤ )

The fun color scheme immediately drew me in and so I scoured my craft stash for ingredients that would fit the bill.

As you can see, I chose to use the Concord & 9th “Yay” die in white. It really pops against the background of colorful cardstock strips. To emulate the “Confetti Dots” background, I used a leftover piece of Crate patterned paper I had lying around.

ptg_temp_save 4As you can see if you click on the original link above, the card Rebecca made is square and was placed onto an apricot-colored envelope, but I thought that placement was a great idea and therefore used PTI Melonberry Cardstock as my base.

The stamp at the bottom is by Savvy Stamps.

ptg_temp_save 3
I added some zig-zag stitching for extra interest and left the center die-cut otherwise unattached, giving it more dimension. I love how it turned out – so cheerful!!

Now onto the other two: As soon as I had laid eyes on the pretty cards that Laurie had made with the use of the Confetti Stencil and the Birthday Wishes die, I knew I wanted to recreate this seemingly simple, yet very effective design.ptg_temp_save
The ink colors for the above version (mounted on Spring Rain CS by PTI) are Citrus (Adirondack), Emerald (Altenew), Seedless Preserves and Worn Lipstick (both Distress Inks).

The sentiment is one layer of white sandwiched onto two layers of Scarlet Jewel by Papertrey Ink. Making four of these cards took me about 6 hours in total (the part where you die-cut the sentiment – in my case 12 times – and layer it all took quite a bit of time).

ptg_temp_save 2
This one is my favorite of the bunch. On the above version, I blended Pink Pearl (Altenew), Picked Raspberry (Distress Ink), Mountain Mist and Volcano Lake (both Altenew).

The sentiment is Scarlet Jewel cardstock by Papertrey Ink (atop two layers of white) and it was all mounted onto a Sweet Blush card base (PTI).

I hope you like them and I’d love to hear from you 🙂
Have you already started with the colorful spring cards?
I think it’s such a fresh breath of air! ❤

Enjoy your weekend!
Nina