Easter Extravaganza

Hello all,

Excuse the grand title, but don’t you just love an alliteration?
I know I do 😀

As promised, I have four coordinating cards to show you today, all made from one ad that landed in my (physical) mailbox a few weeks ago.

Boden, as you might know, is a mail-order company for fashion that I’d say is a bit out-of-the-ordinary and they sometimes send me a coupon or the like. This time, the advertising letter had such pretty design, I had to cut it apart and use it!

But I’ll let you see for yourself:
IMG_0403.jpg
Isn’t the pattern just delightful?!! ❤

The first card was made by simply die-cutting a circle out of the first page of the original ad in order to get rid of the text in the middle.

I then added a cross-stitched circle I die-cut from Raspberry Fizz cardstock (PTI), using a Concord & 9th as well as a Lawn Fawn die. It was all matted onto coordinating Lavender Moon CS (PTI) and the first pretty card was done!

Quick & easy! 😀

IMG_0404 2.jpg
The second page of the tri-fold ad also begged to be cut up 😉 So again, I took a large circle die (MFT) and went to work…

IMG_0408.jpg
Those cute parrots on pink just pop! 😀

I added the “fiesta” (MFT) die-cut in Scarlet Jewel (PTI) and mounted it onto thin strips of foam adhesive. The banner (LawnFawn) was cut from black cardstock and the sentiment hand-written using a Uniball Signo White. The background cardstock here is Soft Blush by PTI. Tadaa!

Don’t the vibrant colors just scream spring and summer?! 🙂

IMG_0409.jpg
The last page of the tri-fold had two more of those sweet little birds, so I decided to die-cut those into tags, getting out my trusty old Crop-A-Dile and eyelets.

(I feel there was definitely some inspiration by derkleineklecks and faltzauber going on – I’ve seen them use eyelets and string so much in the last few months!)

IMG_0419.jpg
I prepped the background with a stamp from Florilèges Design in Cement Ink by MFT, a few sprinkles of Mr. Huey’s and some vellum leaves (Kesi’Art) tucked behind the tag.IMG_0413.jpg
The last one is quite similar, though I switched up the color palette to include more vibrant Scarlet Jewel (PTI) leaves and more messy splatters. 🙂

IMG_0423.jpg
What do you think?

I really enjoyed upcycling the ad and using the pretty design rather than tossing it! So: Thanks, Boden! 🙂 (Please keep sending me pretty mail – I think I’ll use my coupon to order some cute dresses I’ve been ogling! ^^)

Wishing you all a lovely Easter Sunday!
Nina

Out with the old, in with the new

Hello hello,

I’m just checking in with a happy little trio of cards – all of which are birthday cards.

The other week, I was swooning over this stunning creation by Rebecca Luminarias and I knew I wanted to make something like it, just using what I have on hand. (I’m very much looking forward to placing my first order with The Stamp Market, though! Such gorgeous products!! ❤ )

The fun color scheme immediately drew me in and so I scoured my craft stash for ingredients that would fit the bill.

As you can see, I chose to use the Concord & 9th “Yay” die in white. It really pops against the background of colorful cardstock strips. To emulate the “Confetti Dots” background, I used a leftover piece of Crate patterned paper I had lying around.

ptg_temp_save 4As you can see if you click on the original link above, the card Rebecca made is square and was placed onto an apricot-colored envelope, but I thought that placement was a great idea and therefore used PTI Melonberry Cardstock as my base.

The stamp at the bottom is by Savvy Stamps.

ptg_temp_save 3
I added some zig-zag stitching for extra interest and left the center die-cut otherwise unattached, giving it more dimension. I love how it turned out – so cheerful!!

Now onto the other two: As soon as I had laid eyes on the pretty cards that Laurie had made with the use of the Confetti Stencil and the Birthday Wishes die, I knew I wanted to recreate this seemingly simple, yet very effective design.ptg_temp_save
The ink colors for the above version (mounted on Spring Rain CS by PTI) are Citrus (Adirondack), Emerald (Altenew), Seedless Preserves and Worn Lipstick (both Distress Inks).

The sentiment is one layer of white sandwiched onto two layers of Scarlet Jewel by Papertrey Ink. Making four of these cards took me about 6 hours in total (the part where you die-cut the sentiment – in my case 12 times – and layer it all took quite a bit of time).

ptg_temp_save 2
This one is my favorite of the bunch. On the above version, I blended Pink Pearl (Altenew), Picked Raspberry (Distress Ink), Mountain Mist and Volcano Lake (both Altenew).

The sentiment is Scarlet Jewel cardstock by Papertrey Ink (atop two layers of white) and it was all mounted onto a Sweet Blush card base (PTI).

I hope you like them and I’d love to hear from you 🙂
Have you already started with the colorful spring cards?
I think it’s such a fresh breath of air! ❤

Enjoy your weekend!
Nina

Christmas Tags & Cards

It’s almost March already? How on Earth did that happen? 😀

I still hope everyone of you had a wonderful Christmas and a great start of 2019 – it’s been supremely busy here and the cozy Christmas/ New Year slump has finally worn off, albeit not without two (!) nasty cases of the lurgy – one at the beginning of January and one at the beginning of February. It’s the gift that keeps on giving 😉

Needless to say, I haven’t gotten ’round to doing much more than staying alive, working and really barely anything else. I was considering just not posting any of my many Christmas/ Holiday cards since it’s already March, but then again it’s my blog and I can post whatever I like, so here goes – grab a cup of tea and get comfortable! 😀

So just to separate tags from cards, let’s get started with a little gallery:
(if you click on a picture, it’ll display a larger version of the image)

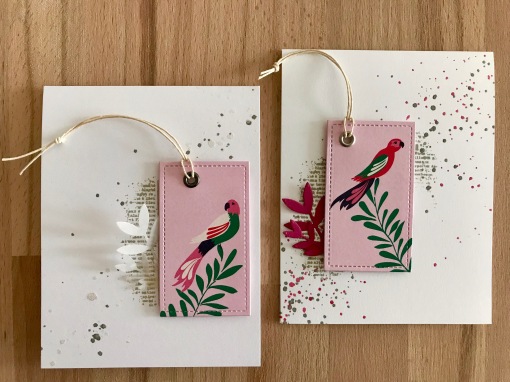
The tags with the cool blending technique were a total CASE of Cathy Zielske’s awesome idea, to be seen here. I love Cathy and all that she does!

(The dies are ‘Avery Elle Tags a Lot’ and ‘Simon Says Stamp CHRISTMAS TREES’; the stamps are by Lora Bailora, bastisrike and Kelly Purkey)

Now onto a roundup of a great number of cards that I made for Christmas. It was a lot as you’ll see in a moment, and a few of these were produced several times, to be sent off or hand-delivered to the 54 (!) recipients that there were in 2018.

Let’s start with the cards featuring a tree motif:

A few deets on some of them: The first four are inspired by the incredible Laura Bassen and her beautiful use of the Christmas Trees Wafer Dies by Simon Says Stamp: see here.

As you can see, I started out copying her idea, just using the papers and stamps I had on hand. I then switched up the design and incorporated other elements like the splatters and staples as well as a tiny star (taken from the Home & Hearth Die Set by Julie Ebersole for Ellenhutson.com).

With card #5 above, I again started out by copying this awesome idea of Julia alias der kleine klecks, the second card however shows another use of the tree detail with different ingredients thrown in the mix. I adore the stamp there, it’s from the Scrapbook Werkstatt advent calendar my sweet boyfriend had gotten me. Spring Moss makes for a great card base and a Home & Hearth star was added for good measure. I love this one!

BTW the beautiful banner on card #6 is by Concord & 9th – so cool to really show off busy background paper! (Saw that idea somewhere on Barbara’s blog.)

Next up: Polar bears!

These adorable little critters on card #1-4 are from a stamp set by Lora Bailora, colored in simply with colored pencils and cut out with my trusty SU! paper snips. This was the first time ever that I’d tried out a blending tool and for that, I’d say those starry backgrounds aren’t half bad 🙂

For these cards, I had no plan whatsoever and just kept pushing things around and adding things until I liked it. The cute polar bear Post-It note is by Paper Poetry and the background stamps on this card are from an old set by the Girls Paperie.

The last pic here is a card design that is a total CASE from this genius creation by Kay Miller, which I – as suggested in the post – stamped with my MISTI in order to mass-produce this mail-friendly one-layer wonder to send out to dear colleagues this holiday season.

Moving on to another design I made multiples of:

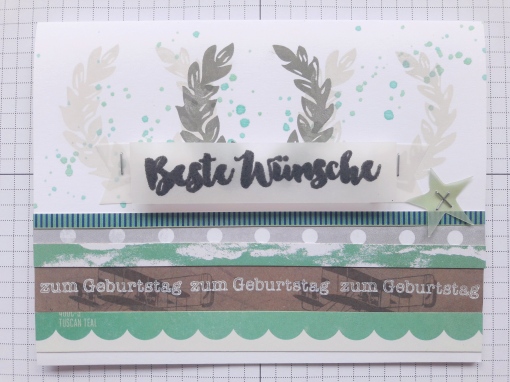
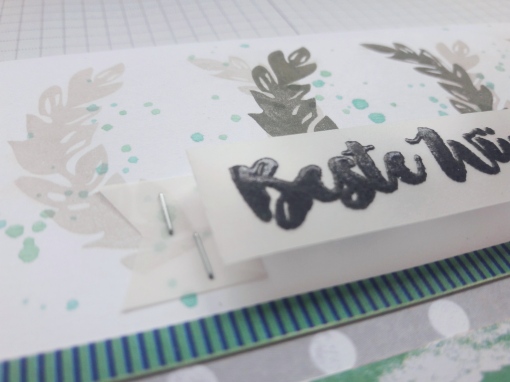
A slight variation of this wonderful creation made by Angeline Yong Jeet Leen, who so ingeniously used the Piestra Tile from Memory Box that I just *had* to have it. (I know you understand 😀 )

The paper used here is gorgeous Rustic White by Papertrey Ink, the washi is from Crate Paper and the silver splatters (sparkly IRL) are Mr. Huey’s. Feel free to ask about other supplies that I’ve not mentioned specifically.

These weren’t as mail-friendly as expected because the Garn&Mehr bows did make for a bulky card in the end. Oh well 😉

These two here have a bit of an old & new theme going on:

For the first one, I wanted to use my new supplies including the “Ho Ho Ho” embossing folder as well as the “Frohe Weihnachten” (Merry Christmas) die, both by Mundart Stempel from Switzerland.

The second one is certainly one of my favorites from the whole bunch, it uses an image and a greeting from a free Christmas postcard I snatched up at a store downtown a few years back. I had to fussy-cut it and the red parts all have a cool glossy finish, which makes it really stand out. The background was stamped with that same Girls Paperie set I love to use, some silver splatters for some extra glam and the Sweet Blush card base really make the red pop. I’m smitten! ❤

And drumroll… last but not least: Some jolly Santas! Recycled ones, at that!

These were cut out from wrapping paper I had saved from some years ago – I thought these Santas were just too cute to toss! So they were fussy cut, added to some cardstock and popped up with foam tape. I love the “Santa’s on his way” sentiment (Santa’s Flight by Julie Ebersole for Ellenhutson.com) combined with the winking Santa.

And of course that very last card is a nod to one of our favorite shows: RuPaul’s Drag Race. If you know it, that’s the very pose RuPaul always strikes before the final runway on each episode, always announcing “And may the best woman… win!”. So when I realized that, I was sooo excited 😀 It was clear that this Santa plus a matching witty sentiment would *have* to be on the Christmas Card for the boyfriend this year. *grin*

So there you have it! 😀

Sorry if some of the pics are less than stellar – it was nearly impossible to get any good shots before these were mailed off due to the utter lack of light in December.

I hope you like the cards, I’d love to hear from you 🙂

See you soon!
Nina

A last summer hooray!

– Dieser Post enthält unbezahlte Werbung. –

Hey there, everyone!

So interpreting season is in full swing (yay!) and The Move is happening (and has been happening for a few weeks now). It is therefore safe to say I have my hands full 😀

I also just came back from a week in South Tyrol, which was spent interpreting and enjoying the beautiful fall sunshine in this marvelous landscape.

Today I have two last summery cards for you – number one was made for my brother’s birthday and I was very much inspired by Julia‘s amazing use of leaf dies and that stunning paper flip-flop display created by Steffi Ried (who I had the chance to meet last weekend!! We had a great time making a mini album!).

Beauty_rde6_FotorThe flip-flops were hand-drawn on the back of a piece of patterned paper (Pink Paislee Confetti wishes 09) and then cut out with a craft knife.

The straps were cut with my guillotine trimmer from some matching PP (Crate Paper Poolside Sunshine) and everything was assembled by tinkering with the width of the straps and of the cuts in the soles a bit.

20180804_105046_Fotor
I popped the handmade sandals up on some foam adhesive and backed everything with a few pretty Monstera and Sorbier leaves (c/o Charlie & Paulchen and Kesi’art) and a sort of “sun” (an older PTI die).

The stamped sentiment is Kristina Werner with SimonSaysStamp and adhered with dimensionals as well.

Next up, we have a “Thank you” card using brand new Dani Peuss Klartext stamp sets, again inspired by Julia’s magnificent die-cut leaves and meant to put a smile on the face of a special someone 🙂

20180924_150651_Fotor
Using the Mini Misti with this set makes stamp positioning a breeze and before you know it, you have a beautiful sentiment for your card.

I added the two words atop by hand (first drew them lightly with a pencil, then used a simple black fineliner – Edding 88 is my all-time favourite – to finish it off).

20180924_150628_Fotor
Black Mr. Hueys to complete the look and the papers used here are Mahé, Basic Grey, Crate Paper and PTI Raspberry Fizz.

Since this little card was sent from South Tyrol, I am a bit weary regarding its whereabouts and whether it will make it to the recipient… oh the Italian mail service… I don’t trust them one bit, but really wanted to finally mail the card! What a dilemma!

Anyway, I’m off to do some more moving stuff from one room to another and organizing and writing invoices – may the extra hour mean getting more done!! 🙂

Cheerio,
Nina

Grandpa’s Birthday

– Dieser Post enthält unbezahlte Werbung. –

Hey everyone 🙂

How are things? Over here, the sun is very much trying to melt us and I have now entered into a relationship with a wet tea towel and the fan. The boyfriend knows, though 😉

A few weeks back, my gramps had his birthday and I made him this little number to congratulate him:

20180710_141712_Fotor.jpg
It features some more random border strips and scraps, some Crate Paper, some My Mind’s Eye, assembled in a way that is pleasing to the (read: my) eye.

20180710_141836_Fotor.jpg

I then stamped the laurel wreath from the Ellen Hutson Set “Home and Hearth” (by Julie Ebersole) in Silver Fox and Fog (Avery Elle) in a slightly overlapping fashion and sprinkled some Mint Julep and Seafoam Mr. Huey’s on top.

I then decided to add a vellum banner, a vellum star and a matching sentiment (Danipeuss Klartext + Papierprojekt).

20180710_141724_Fotor.jpg
The vellum items were set in place using the Tiny Attacher – I find it always lends a cool/masculine touch to any project.

My grandpa loved his card and my grandma had to convince him that this was actually handmade by me, he couldn’t believe it 😀 (Honestly, that makes me wonder where he thought the cards came from all these years – I’ve been making them for exactly 10 years now and I guess he must have thought I buy them or whatever 😀 )

Ah, grandparents. They’re just cute sometimes, right?
(Which immediately reminds me of Iliza and her Netflix special “Confirmed Kills”, I quote: ” ‘Oh my god, you guys, my pip-pop is so cute. Sometimes at Christmas, when pip-pop falls asleep, we like to decorate him with Christmas bows. Isn’t that funny? Silly pip-pop!’ – Pip-pop’s got 53 confirmed kills!!” Anyway, I digress – but go and watch that Netflix Special, so worth it!)

Alright, that’s it from me for today, hope you liked it and see you soon!
Nina

Wake up! It’s your day!!

– Dieser Post enthält unbezahlte Werbung. –

Hey there 🙂

Just checkin’ in to show you my latest creation – again a masculine birthday card (I know!!) and again making a dent in the huge amount of border strips and scraps I have lying around:

20180614_115127_Fotor
I’m making good use of my beloved Savvy Stamps “It’s your day” wood-mounted stamp, and this time it came in super handy since I picked an alarm clock ephemera piece which I believe is from one of Shimelle’s first collections.

I took a pencil to wrap a bit of thin wire around it, just 3 coils, and then used two foam adhesive squares to attach the wire to the clock and to the card. So you can give the clock a tiny bit of a push with your finger and it wobbles! How fun is that?!! 😀

20180614_115137_Fotor
The ink is Versafine Onyx Black, just stamped off a few times to really get the “alarm clock going off”-feel across.

The “Jippie!” stamp is from catsonappletrees and the border strips are a wild mix from my stash – Crate Paper, My Mind’s Eye, American Crafts etc.
20180614_115018_Fotor.jpg
Hope you like what you see – feel free to leave a comment if you did 🙂

Today I’ll be off to seeing “Ocean’s 8” in the cinema – honestly, I’d say the weather rather calls for swimming in a lake, but I’ve promised my friends to go to the movies with them, so… ah well.

Have a great Sunday, y’all!

Party Animal Birthday Card

– Dieser Post enthält unbezahlte Werbung. –

Hello, hello 🙂

Today I am back with something I made to grow my always depleted birthday-card stash.
I find it tricky to create masculine cards, since I have to steer clear of bows, pink, glitter, butterflies and all the other things that make life a little more sparkly 😉

Fortunately, birthday cards are always fun, so here is one more of the “Use your border cuts and snippets” series – this time using the “Party Animal” stamp set by Avery Elle with some American Crafts Turquoise Pigment ink stamped in a Die-Namics double stitched circle:

Beauty_b1im_Fotor.jpg
This also uses a cute wooden “Jippie!” (=”hooray!”) stamp by the German company catsonappletrees stamped in Versafine Black Onyx ink, some Mr. Hueys for the paint splatters and the paper strips on the bottom are Crate Paper, My Mind’s Eye, Cosmo Cricket and Studio Calico, if I remember correctly 🙂

One little thing I did was to curve the otherwise straight sentiment strips to fit around the circle perfectly. You can do that once you’ve placed the strip on your acrylic block and then use the die-cut circle as your template. A tip here would be to stamp the sentiment before you pop the circle up on foam, just to make your life easier.

Anyhoo, that would be all from me now, I hope you’ve had a splendid week (mine was… well there were ups and downs, let’s put it that way. Imagine being pushed into a pool of… manure… through no fault of your own other than standing too close to said pool without even realizing and now it is your daily task [on top of all other tasks] to use that teaspoon you have been given to dig your way out of that mess. Yeah. My mantra is: One day at a time, one step at a time.) and that this long parenthesis of tmi in the middle of what was just going to be a wave goodbye if at all made you count your blessings 😉

Have a great new week and see you soon! *wave*
Nina


MerkenMerken

But wait, there’s more!

– Dieser Post enthält unbezahlte Werbung. –

Hey there 🙂

I got the luxury of a day off this week (which for me just meant a day without appointments, not a day without paperwork, emails and such 😉 ), so I thought I’d stop by and show you another creation with the name of an extremely cute newborn.

Beauty_uzou_Fotor.jpg(Sorry if the picture isn’t the best – another thunderstorm was just about to start…)

This time, it’s for a baby boy (or rather – his parents) and I made good use of my Papertrey Ink alphabet dies, arranging them around a curved shape and layering some cute patterned paper behind the cutouts.

Beauty_v50z_Fotor.jpg
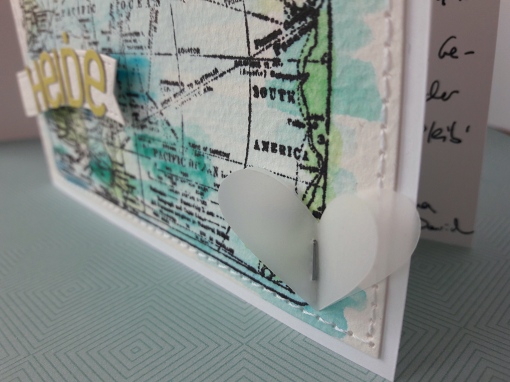
Again, a great way to use your little border cuts and snippets and make them into something beautiful 🙂 (Behind the “M”, there’s the word “Liebe” which means love, just a little extra detail ❤ ) The finishing touches are a stitched line in a powdery mint green and some wooden stars. What do you think?

And while we’re on the subject of personalized cards – a good friend had a birthday this Monday and I thought since she is quite the globetrotter, why not use my Tim Holtz’ Air Travel stamps for her birthday card?

20180614_115415_Fotor.jpg
Absolutely essential for stamping on watercolor paper: The Misti.
Add four different sheets of the Peerless Watercolors and an Aquabrush to the process and you’re good to go!

The stitched border is elegant and gives everything a handmade feel at the same time. I remembered to layer my punched hearts and added a banner with her name to make the card even more personal.
20180614_115449_Fotor_Fotor.jpg
I think it turned out pretty cool, and given that she’s a cool lady I’d say: It’s a match! 😉

That’s all for me this week, hope you’re having a good weekend wherever you are!
Nina

P.S. Just for my personal record: This has been one of the shittiest weeks in my life so far, but I am determined to not let these events get me down. I will fight and continue to be grateful for all that I have and for those who are supporting me. Love wins.

MerkenMerken

What’s in a name?

– Dieser Post enthält unbezahlte Werbung. –

Well hello,

Didn’t expect me that early in the week, huh? 🙂

Here we are with a card featuring the name of a very cute girl that was recently born.
A personalized card somehow makes for a more special statement – and what could be more special than the day a new life comes into this world?

20180514_084323_Fotor.jpg
This is another instance where I’ve made good use of my stash of snippets (N° 1 see here) – it’s mostly Crate Paper, with a tiny bit of Stampin’ Up and an old book page thrown in for good measure. If you look really closely, you’ll find the words “Liebe” (love), “Dank” (thanks) and “Freude” (joy) on there ❤

Beauty_lyk7_Fotor.jpg

The bottom of this landscape card was embossed using PTI’s Cane Print Impression Plate and everything was finished off with a banner cut with the Silhouette, a handwritten sentiment and a lovely bow using embroidery thread in a soft, buttery yellow complementing the book print “N” and the backgrounds of some of the other letters.

The alphabet dies are Papertrey Ink as well.

I’m entering this card in the “Task for Two Tuesday” Challenge which is all about names this time – I know my card is missing a mascot, but it has all the other elements 🙂

Cheerio!
Nina

MerkenMerken

MerkenMerken

Little Birdie Thank You

– Dieser Post enthält unbezahlte Werbung. –

Hey all,

How’s it?

Over here, we’ve got summery temperatures and tonight’s the first of three castle fireworks events this year in Heidelberg ❤

Card-wise, I’ve got something clean and simple for you today, featuring a sweet little bird saying “Thank You”.

20180514_183744_FotorThe background was stamped with a cute Cats On Appletrees stamp in “Fog” (Avery Elle), I then added a label (forgot where that was from) and a bow (embroidery twine), popped that up on some foam adhesive.

20180514_183750_FotorThe little bird is Marianne Designs, cut from Kraft cardstock and adhered to a ticket I had lying around, patterned paper is older Cosmo Cricket. A few enamel dots and there you go! 🙂

Clean, simple and cute.

Hope you’re enjoying your weekend, wherever you are!

Nina